When it comes to optimizing your ice bath experience, a water chiller is an invaluable tool. Unlike traditional methods of adding ice, a water chiller provides a consistent and controlled temperature, ensuring that your ice bath is always at the perfect level for recovery.
However, like any piece of equipment, a water chiller requires proper setup and maintenance to function effectively and avoid premature breakdowns. Without the right care, you risk not only losing the benefits of your ice bath but also facing costly repairs or replacements.
Fortunately, with the guidance provided in this guide, you can rest easy knowing that your chiller will be set up correctly and maintained to last for years to come.
Follow these steps to ensure that your water chiller remains a reliable part of your recovery routine.
Setting Up the Chiller
Step 1: Location and Ventilation
Proper location and ventilation are crucial for the efficient operation of your water chiller. Follow these guidelines to ensure optimal performance:
- Surface: Place the chiller on a flat, stable surface near your ice bath tub to prevent any movement or imbalance.
- Air Inlet Clearance: Ensure there is at least 4-5 feet of clearance on the air inlet side of the chiller. This allows for adequate airflow and prevents overheating.
- Side and Back Clearance: Maintain at least 2 feet of space on the other three sides of the chiller to facilitate proper ventilation.
- Top Clearance: Leave at least 6 inches of space above the chiller to allow heat to dissipate effectively.
- Consult the Manual: Always refer to your unit’s manual for specific ventilation recommendations, as requirements may vary by model.
Adequate ventilation is vital to prevent overheating, which can lead to inefficiencies and potential damage to the chiller. Ensuring proper airflow will help maintain the unit’s performance and longevity.
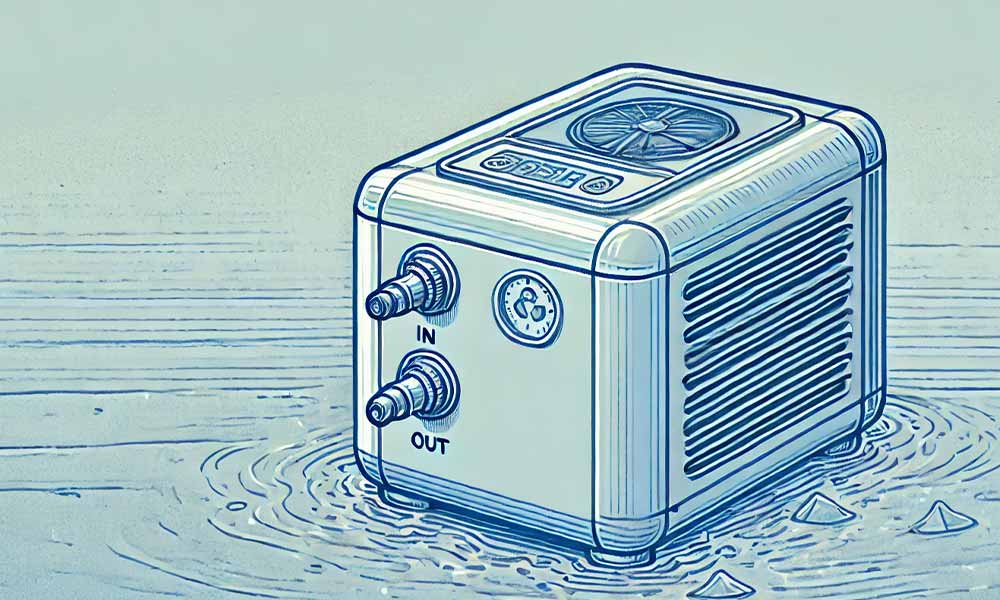
Step 2: Secure Connections
Next, securely connect the inlet and outlet hoses to your tub. This ensures that the water flows correctly through the system. Install any seal rings provided with the chiller to prevent leaks. Leaks can lead to water wastage and reduce the efficiency of the chiller by sucking in air, so double-check all connections. If your chiller doesn’t come with a filter, consider adding a cheap metal sediment filter into your hose prior to the water entering your chiller. But be sure to check this filter often as it can clog over time and reduce waterflow, which can potentially burn up your water pump.
Step 3: Power and Safety
Plug your chiller into a power outlet that matches its voltage requirements. Keep all electrical parts at least 5 feet away from water to prevent shocks. Check connections regularly to make sure they’re tight and dry.
Keep an eye out for:
- Leaks
- Weird noises
- Too much shaking
If you notice any of these, fix them right away. They can turn into bigger problems if ignored.
Step 4: Priming the System
Priming your ice bath water chiller is a crucial step to ensure its efficient operation and longevity. Even if your unit is self-priming, manually priming it can enhance performance and prevent potential issues. Priming a water chiller involves filling the system with water to remove any air pockets that could impede its operation.
Here are some reasons why priming is important:
- Prevents Airlocks: Air pockets can create airlocks in the system, disrupting water flow and reducing cooling efficiency. Priming ensures that these air pockets are eliminated.
- Enhances Efficiency: A fully primed system allows water to circulate freely, ensuring that the chiller operates at its optimal capacity and maintains the desired temperature consistently.
- Protects the Pump: Running a chiller without water can damage the pump, as it relies on water for lubrication and cooling. Priming ensures that the pump is always submerged in water, preventing overheating and wear.
- Extends Lifespan: Regular priming helps maintain the chiller’s performance and extends its lifespan by preventing unnecessary strain on the system.
The next section will walk you through the process of priming your chiller.
Step-by-Step Guide to Priming Your Water Chiller
1. Initial Setup
- Check Connections: Before starting, ensure that all hoses and connections are secure and free of leaks. This will prevent water loss during the priming process.
- Position the Chiller: Place the chiller in its designated location, ensuring it is on a flat, stable surface with adequate ventilation.
2. Fill the Ice Bath
- Water Level: Begin by filling your ice bath until the water level is just below the top port that returns water to the tub. This initial filling is crucial for creating the necessary pressure to expel air from the system.
3. Prime the Hoses
- Position the Hose: Place your hose against the bottom port on the tub that pulls water to the chiller.
- Observe Water Flow: Continue to hold the hose in place until water flows out of the top port. This indicates that air has been purged from the system and the hoses and chiller are fully primed.
4. Complete the Filling Process
- Final Water Level: Once the hoses are primed, complete filling your ice bath to the desired level. This ensures that there is enough water for the chiller to operate efficiently.
5. Activate the Chiller
- Power On: Once the system is fully primed and the ice bath is filled, turn on the chiller. Monitor the system for a few minutes to ensure that water is circulating properly and there are no leaks.
6. Repriming Your System
Repriming your water chiller is necessary every time you drain and clean your tub or relocate the chiller. This ensures that the system remains free of air pockets and operates efficiently.
- After Draining and Cleaning: Once you’ve drained and cleaned your ice bath tub, follow the priming steps outlined above before refilling the tub. This will ensure that the chiller and hoses are free of air and ready for optimal operation.
- After Relocating the Chiller: If you move your chiller to a new location, it’s important to reprime the system. Moving the unit can introduce air into the hoses and disrupt water flow. Repriming ensures that the system is fully operational in its new position.
Regular priming is a simple yet essential maintenance task that can prevent common issues and extend the life of your chiller. Remember, a well-maintained chiller not only enhances your ice bath experience but also protects your investment in the long run.
Tips For Achieving Ideal Temperature
- Temperature Settings: Set the chiller to your desired temperature, while many chillers can reach temperatures in the high 30s, the ideal ice bath temperature where you’ll find benefits is typically between 50-59°F (10-15°C).
- Cooling Time: Depending on your unit it can take a few hours for ambient water to reach your desired temperature. Use a thermometer to verify the water temperature to ensure that you’re getting the full benefits of the ice bath.
- Continuous Operation: To maintain the set temperature, the chiller will cycle on and off automatically. It’s recommended to leave the chiller running continuously, as this can reduce strain on the unit and save energy over time. If you use the ice bath less frequently, you can turn off the chiller when not in use to conserve energy.
- Insulating Your Tub: The more insulated your ice bath is easier it is for your chiller to cool your tub. Also the less your chiller has to run and the longer its lifespan will be.